首先將 Xcode 打開
按下 Create a new Xcode Project
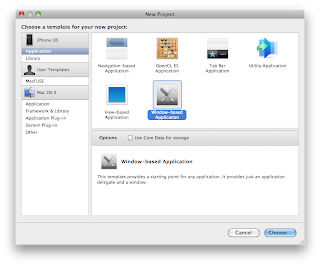
將會看見以下畫面

選擇 Window-based Application

輸入 Project 名稱: HelloWorld

選取 Classes 的文件夾
按下滑鼠右鍵 -> Add -> New File

選擇 UIViewController sub class
注意: 請不要選取 UIViewTableControlle sub class 和 with XIB for user interface 的 Option

輸入名稱: HelloWorldController
Xcode 將會自動創作出 2 個檔案
HelloWorldController.h 和 HelloWorldController.m
然後我們在 HelloWorldAppDelegate.h 輸入以下程式碼
//
// HelloWorldAppDelegate.h
// HelloWorld
//
// Created by LOK on 10年1月10日.
// Copyright __MyCompanyName__ 2010. All rights reserved.
//
#import
@interface HelloWorldAppDelegate : NSObject{
UIWindow *window;
UIViewController *rootController;
}
@property (nonatomic, retain) IBOutlet UIWindow *window;
@property (nonatomic, retain) IBOutlet UIViewController *rootController;
@end
在 HelloWorldAppDelegate.m 輸入以下程式碼
//
//  HelloWorldAppDelegate.m
//  HelloWorld
//
//  Created by LOK on 10年1月10日.
//  Copyright __MyCompanyName__ 2010. All rights reserved.
//

#import "HelloWorldAppDelegate.h"
#import "HelloWorldController.h"

@implementation HelloWorldAppDelegate

@synthesize window;
@synthesize rootController;


- (void)applicationDidFinishLaunching:(UIApplication *)application {

    //Create a custom UIViewController and assign to window attribte
    self.rootController = [[HelloWorldController alloc] init];
    [window addSubview:self.rootController.view];
    [window makeKeyAndVisible];
}


- (void)dealloc {
    [window release];
    [super dealloc];
}


@end
不用在 HelloWorldController.h 輸入程式碼
在 HelloWorldController.m 輸入以下程式碼
//
//  HelloWorld.m
//  HelloWorld
//
//  Created by LOK on 10年1月10日.
//  Copyright 2010 __MyCompanyName__. All rights reserved.
//

#import "HelloWorldController.h"


@implementation HelloWorldController

/*
 // The designated initializer.  Override if you create the controller programmatically and want to perform customization that is not appropriate for viewDidLoad.
- (id)initWithNibName:(NSString *)nibNameOrNil bundle:(NSBundle *)nibBundleOrNil {
    if (self = [super initWithNibName:nibNameOrNil bundle:nibBundleOrNil]) {
        // Custom initialization
    }
    return self;
}
*/


// Implement loadView to create a view hierarchy programmatically, without using a nib.
- (void)loadView {
 //Create a UIView for this controller display
 UIView *rootView = [[UIView alloc] initWithFrame:CGRectMake(0, 0, 320, 460)];

 //Create a label for display "Hello World" text
 UILabel *labHelloWorld = [[UILabel alloc] initWithFrame:CGRectMake(100, 200, 100, 50)];

 //Set "Hello World" text to labHelloWorld
 labHelloWorld.text = @"Hello World";

 //Assign the rootView to this controller
 self.view = rootView;

 //Add label to controller view
 [self.view addSubview:labHelloWorld];

 //release object
 [rootView release];
 [labHelloWorld release];
}


/*
// Implement viewDidLoad to do additional setup after loading the view, typically from a nib.
- (void)viewDidLoad {
    [super viewDidLoad];
}
*/

/*
// Override to allow orientations other than the default portrait orientation.
- (BOOL)shouldAutorotateToInterfaceOrientation:(UIInterfaceOrientation)interfaceOrientation {
    // Return YES for supported orientations
    return (interfaceOrientation == UIInterfaceOrientationPortrait);
}
*/

- (void)didReceiveMemoryWarning {
 // Releases the view if it doesn't have a superview.
    [super didReceiveMemoryWarning];

 // Release any cached data, images, etc that aren't in use.
}

- (void)viewDidUnload {
 // Release any retained subviews of the main view.
 // e.g. self.myOutlet = nil;
}


- (void)dealloc {
    [super dealloc];
}


@end
現在可以按下 Build and run 去測試一下程式了。
執行畫面如下:
大功告成了!是不是很簡單呢。
完整範例在這裡: HelloWorld.7z
解壓密碼: lawpronotes.blogspot.com
P.S. 在 MAC 下解壓縮 7z 檔案可以使用這個 EZ 7z


